

在宅勤務開始しますメールとか毎日打つのめんどくさいなぁ。。

Excel VBAを使ってOutlookのメール作成作業を自動化してみよう!
目次
ExcelVBAでOutlook自動メール作成 サンプル
Excel VBAを利用してOutlookメールをボタン一つで自動生成したい
今回は、そんな方にとって役に立つサンプルコードを準備しました。
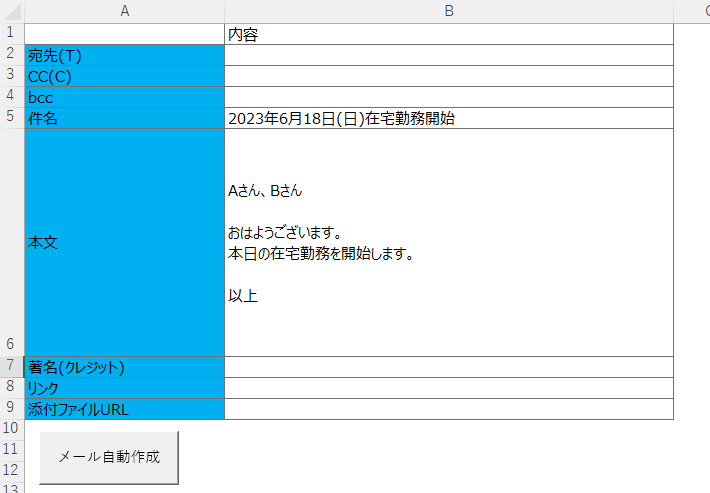
下準備として、Excelファイルに宛先、本文などの情報を保存しておきます。
サンプルを添付しておきますので、ご活用下さい。
ExcelのText関数とToday関数を使って、今日の日付が自動に入るようにしています。

サンプルは下記になります。コピペで使ってね!ワークシート名を”Outlook自動メール”とするか、コードを書き換えて活用してね!
Sub sendmail_sample1()
Dim Toaddress As String, Ccaddress As String, Bccaddress As String
Dim Subject As String, MailBody As String, Credit As String
Dim OutlookObj As Outlook.Application
Dim mailItemObj As Outlook.MailItem
ThisWorkbook.Worksheets("Outlook自動メール").Activate
Toaddress = Range("B2").Value
Ccaddress = Range("B3").Value
Bccaddress = Range("B4").Value
Subject = Range("B5").Value
MailBody = Range("B6").Value
Credit = Range("B7").Value
Set OutlookObj = CreateObject("Outlook.Application")
Set mailItemObj = OutlookObj.CreateItem(olMailItem)
mailItemObj.BodyFormat = 3
mailItemObj.To = Toaddress 'Toをセット
mailItemObj.CC = Ccaddress 'CCをセット
mailItemObj.BCC = Bccaddress 'BCCをセット
mailItemObj.Subject = Subject '件名をセット
'本文をセット
mailItemObj.Body = MailBody
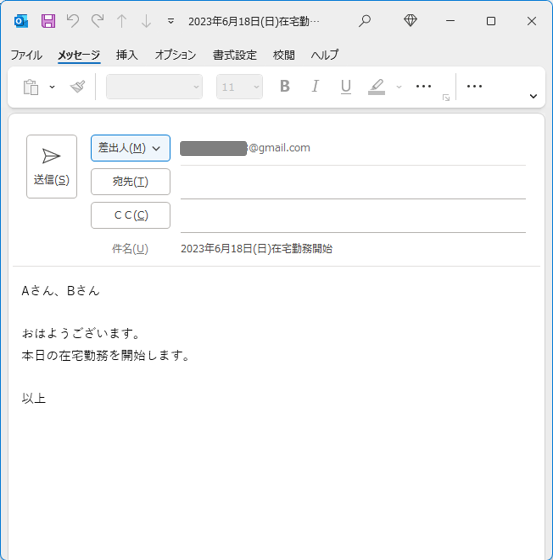
'メール表示(誤送信を防ぐために表示だけにして、メール送信はしない)
mailItemObj.Display
Set OutlookObj = Nothing
Set mailItemObj = Nothing
End Sub
ExcelVBAでOutlook Object Library有効方法
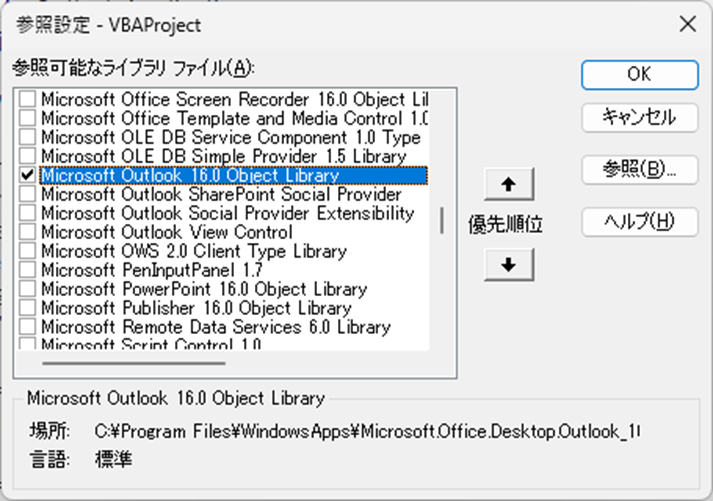
サンプル5行目の部分でエラーが発生する場合は下記の手順でOutlook Object Libraryを有効にして下さい。
1.ツールから参照設定をクリックしてください。
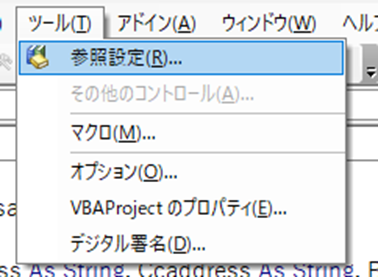
2.Microsoft Outlook 16.0 Object Libraryにチェックボックスを入れて下さい。
まとめ
この記事を参考にExcel VBAを使ったOutlookメール自動作成を覚えていただき、ミス削減や生産性向上につながるととても嬉しいです!
VBA初級から抜け出すための知恵と、実務で活用できるスキルが学べる1冊です!激しくオススメ!


コメント